


Sometimes its easier to upload a bulk list of products, rather than manage them individually. With the builder, we use the term PRODUCTS loosely. Products could mean a collection of assets/content that are associated with one another and in turn are contained all in one collection. Here are the steps to complete this, we assure you it will make your life easier to manage a boatload of content and it’s all via a spreadsheet!
STEP BY STEP INSTRUCTIONS
Step 1)
Download the template files attached here. You will need to be able to unzip the file on your computer.
Step 2)
After downloading the template files to your local drive, you will see the folders are named with a SKU number, there is a shared folder for shared documents and a .CSV file that needs to remain named products.csv
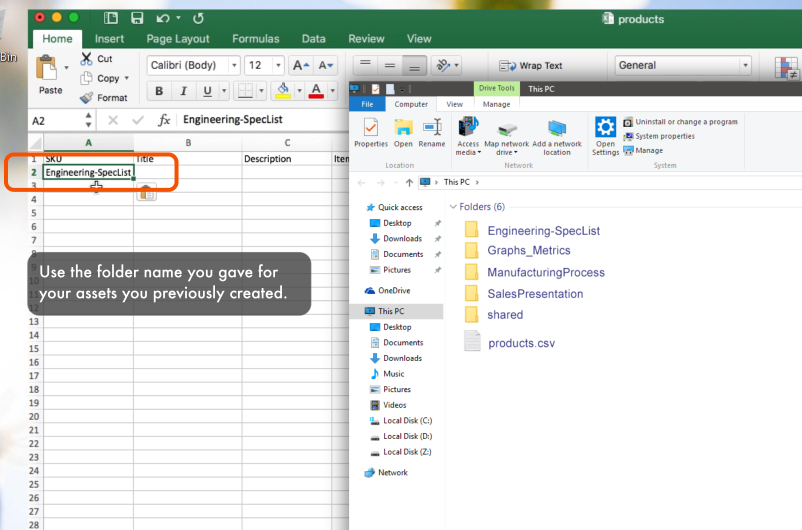
Step 3)
You can rename these template folders to whatever you like, try to avoid spaces and special characters…
- The name of these folders will become the name of your product in the builder.
- Examples:
- Sales_Presentation
- 675SXMachine
- Inside-The-Product
Step 4)
As you will see, each folder except the shared folder needs to have an assets folder and a thumbnail folder inside.
- Assets: All content that you want associated with a product JPGs, PNGs, .MP4s, PDFs etc…
- Thumbnail: A .JPG or .PNG to give the user a visual reference of what the content is that is associated with that product.
- NOTE: If you don’t have an asset in this folder, the builder will automatically default the first image in your assets folder for the thumbnail.
If you add PDFs to the Assets folder, the builder will take the PDF and convert each page to a JPG that is optimized for clarity and size and then adds them to this product.
Step 5)
Now, you need to edit your .CSV file that will become the manifest for your folder upload.
Step 6)
The 9 columns you have available as a user are listed below:

Column A – SKU number of the product. This is also associated with the name of the folder you just created. They MUST match.
Column B – Title is the title or name of the product.
Column C – Description of the product. All keywords that the user can use on their mobile device to search for.
Column D – Any number or descriptive term associated.
Columns E thru I are only used for prices associated with the quote builder toolset. They are not required to be filled out for product upload.
Column J is for products that have content that is shared with other products. Simply add the file name with no extension on it (example: if the file is salesbrochure.pdf, just add sales brochure to the shared column).
If you have multiple shared files for a product, separate each file name by a semi-colon (;).
Step 7)
Use your folder names for Column A.
Step 8)
Fill out Column B – Title is the title or name of the product.
Fill out Column C – Description of the product. All keywords that the user can use on their mobile device to search for.
Fill out Column D – Any number or descriptive term associated.
Step 9)
Once you have finished adding all of your products, you must “close” your .CSV by making sure there are nine columns included in it. To do that, On the last column and the last row, type in equals with two quotations – (=””)
This closes the csv file.
Save the CSV.
Step 10)
Select all folders and your product.csv file and zip up the contents. The name of the ZIP file doesn’t matter.
If you don’t have a ZIP application on your computer, try….
WINZIP – www.winzip.com
Step 11)
Log into the builder at https://member.command-app.com . Once you have logged into the builder, select the products list item on the left-hand side.
Step 12)
Select the Upload Product ZIP button from the top buttons in your browser.
Step 13)
Click the “Choose File” button from the drop-down that appears on your screen. Navigate to your previously created ZIP file. Click Open.
Step 14)
Once the ZIP file has been chosen, click proceed.
ZIP files are recommended to be less than 40MB, due to the time it takes a browser to process information. If you have a need to add more products that are over 40MB in total, separate batches are possible and recommended.
Step 15)
Once your files have been uploaded successfully, there will be a green success popover that notifies you of your recent additions. Additionally, your products are created in a list on your screen.
If there is an upload failure, a warning prompt will tell you what might be wrong.
Typical warnings include:
Not including all 9 columns in your CSV file
Unsupported file types
Not naming your CSV file products.csv
At any point, you can edit the
– Title
– SKU
– Description
– Item Number
You can also add additional files to the product by adding assets at the bottom of the product page.
Step 16) Adding to a collection
Once you have added all of the products you want to add, click your application’s window on the left.
Step 17)
Select Add Collection.
Step 18)
Give your collection a title.
Step 19)
Click Add Product.
You can select one or many different products to add to a collection. This will add all of the assets associated with that specific product.
Drag & drop and reorder assets any way you would like.